Attachment selection decides how a head feels in the cut, how clean the finish looks, and how many times you must stop to retorque or replace hardware, and the truth is that vegetation type is the first filter you should apply before you ever look at a brochure or a parts price.
A clean pine thinning asks for sharp steel and a high slicing angle, a mixed brush block rewards a tougher tooth with a stable bite, a roadside corridor demands controlled discharge and a guard package that keeps chips down near the edge, and a disturbed site after storms or grading work pushes wire and fines toward seals, which means a more defensive setup with carbide and strong end protection.
This article turns attachment selection into a reliable method, map your stand, pick a pattern that fits the ground, then choose tooth style, cutting angle, and retention that match the fiber you will actually meet.
When you do this consistently, production rises without pushing the drive, fuel burn steadies because the rotor lives in its efficient zone, and bearings run cooler because the head stays balanced and the chips fall where they should.
Attachments by vegetation profile
Vegetation is not a single variable, it is density, moisture, grit, fiber length, stem variance, and ground contamination, and that mix changes how teeth load, how chips form, and what the rotor must endure.
Selecting attachments by vegetation profile means you start from the material and finish you need, not from a generic promise, you decide whether you are slicing clean wood, tearing stringy brush, or meeting dirt and gravel, then you set tooth material, geometry, and door angle for that reality.
The aim in this section is to give you a practical framework you can carry from block to block, with the same language for clean stands, transition zones, and public edges, so crews can make consistent choices without a debate in the yard or a guess at the first row.
The method here also helps buyers specify a mixed fleet sensibly, with one head set for premium finish, another set for dirty corridors, and a third set for recovery work where contamination is a fact of life, and all three with retention hardware and torque values that your team can support with field tools rather than with shop downtime.
Clean timber and fine finish expectations
Clean timber is where sharp steel teeth shine, because they slice rather than pound, they leave a fine chip, and they carry less heat into the oil for the same cubic yards cut, provided the operator holds a steady bite and the pattern avoids re-cut. In thinning passes and selective cuts, a straight rotor with consistent tooth height and a clear slicing angle gives you chips that fall down and forward, finish that looks uniform at inspection, and a sound that tells you the rotor is making work instead of fighting vibration.
The retention system matters as much as tooth choice, because a steel knife that spins or sits under torque will cut poorly and shake the head out of balance, so match hardware to real field torque values, paint mark the fasteners after you set them, and walk the lip during the first hour to confirm nothing is moving.
In long timber corridors, it also pays to control discharge with door angle rather than by crowding, because a crowded door adds drag, heat, and stray throw that you will need to correct on the return. If you are aligning attachment choice with the way a fast crew keeps speed without sacrificing finish, study the behaviors that separate smooth production from noise and heat in the field note on what makes a mulcher high performance in the field, then mirror those habits in your setup and in your operator brief.
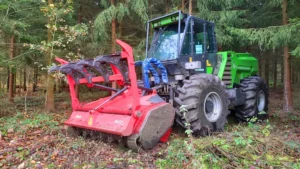
Mixed brush and transition zones, from saplings to vine
Transition zones challenge any single tooth style, because the head meets soft stems, brittle branches, and stringy vine in the same row, which means your attachment must resist spin, hold angle under shock, and keep the bite predictable even as the load changes from one second to the next. Carbide options bring durability in abrasive pockets, while hybrid or reversible steel profiles can preserve a clean finish in patches of pure wood. The win is to choose a pattern and tooth set that avoids violent bite changes and reduces the moments when stringy fiber walks into seals.
That is as much about geometry and retention as it is about material, a positive lock that keeps teeth at the correct angle, a rotor that stays straight and quiet, and a door setting that keeps chips down rather than out. Operators should enter gently, read chip flow, and change bite before speed drops, since a sudden surge and stall costs more fuel than two light passes, and it also loosens hardware in the process.
Here is a short rule set your crew can post in the cab before a mixed brush day, simple, specific, and easy to enforce on the radio:
- start with a moderate bite and adjust one step at a time when chip flow thickens or thins, never jump two steps in one move
- pick carbide where dirt and grit are common, pick sharp steel or mixed profiles where clean fiber appears in blocks
- set an inward door angle near public edges, keep throw short, and reduce bite near vine to prevent wraps that damage seals
These rules keep the head calm and make the most of your attachment choice while you move through a stand that will try to surprise you on every pass.
If your work calendar includes large mixed forestry blocks where output targets are strict, align attachment selection and these rules with the production planning outlined in forestry sector requirements for high output mulchers, then map your tooth inventory to the species and moisture you expect in each window.
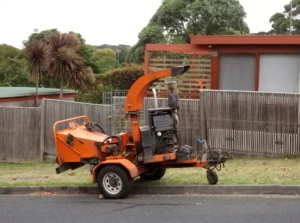
Roadside edges and rail corridors with public buffers
Road and rail interfaces add a public safety layer to attachment selection, because chip control, predictable bite, and visibility become non negotiable. The right attachment for roadside brush gives you a steady cut at shallow bite with chips that drop instead of fly, and it allows an operator to adjust quickly when a signpost, a marker, or a storm drain comes into view.
Chain curtains, deflectors that hold shape, and a door setting that favors short throw will do more for your finish and for public confidence than any claim about raw power, provided the teeth stay put and the rotor stays balanced as you ease around fixtures.
Choose tooth styles that resist spin under sudden light contact, because a spinning tooth near a curb risks scarring the surface and sending chips where they should not go, and choose retention hardware that matches field torque tools so a mid shift check is fast and consistent.
Most important, match the attachment to the corridor pattern, straight rows with controlled overlap, return paths that avoid piles, and a starting edge that keeps throw inside your lane, because discharge control is part attachment and part method.
For a practical view of how corridor teams stage, plan passes, and protect public edges while keeping pace, review the practices under roadside and railway clearing and write those constraints into your attachment notes so the iron on the head supports the plan on the ground.
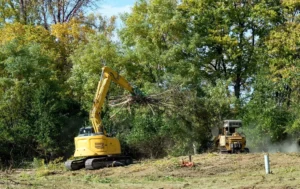
Harsh ground and post disturbance work

Harsh ground, gravel tracks, storm debris, and sites with wire or fence hidden in the thatch demand a more defensive mindset for attachment selection, because the goal is not only to make chips, it is to survive contact without wrecking a motor seal, a bearing face, or a set of fasteners.
These sites load the rotor with shock and contamination, which means tooth material, end protection, and seal guards move to the top of the list, while raw slicing performance moves down, not because you do not want clean chips, but because you will cut more of them over a week if the head finishes each day intact. When you pair a tougher tooth with rope cutters, seal protectors, and a sensible door angle, you give operators a setup that forgives a brief touch with gravel, deflects wire and vine from the ends, and keeps the bite stable when a hidden board or a rock interrupts the cut.
Field rhythm matters here too, operators must slow a little earlier, lift when the stream lifts, and run a cleanout before heat soars, because that rhythm turns a stressful site into a steady day where the head remains square, quiet, and ready for the next shift.
Rocky and debris heavy sites that punish soft hardware
On rock and debris, a soft or thin tooth becomes a liability and will shake the rotor out of balance before lunch. Carbide tips with a geometry that rolls into the cut rather than hooking hard will ride across grit without grabbing, which protects the drive and the operator from stall and surge.
Retention has to be positive, not partially worn pins or mixed hardware, because vibration grows in dirty ground and will find the weak fastener first. End protection earns its keep fast, rope cutters at both ends, seal guards that cover the faces, and room to clean around housings so heat never bakes packed chips near the bearing.
Operators should learn to read the stream and the sound, a rise in pitch or a lift in chip arc means grit has reached the teeth or the door has started to crowd, and that is the cue to thin the bite and reset the angle, not to push through and accept heat that will cost time later.
Sites after storms or grading work also hide wire, staples, and fragments that walk toward seals when you least expect it, so plan one midday pause to clear the lip and the ends, and treat that pause as production, not as a delay.
For crews that cut after severe weather or who must clear fallen lines and wind rows, align your attachment choice with the operating cautions gathered for that specific work in storm cleanup, and teach the rope cutter check as part of the pre start brief, since that small habit prevents the failure that ruins a week.
Cold weather, frozen fiber, and brittle stems
Cold changes fiber behavior, seals harden, oil thickens, and the same tooth that glides through summer stands can chatter on frozen brush, which means attachment selection must adapt to season as well as to species. In frozen stems, a knife profile with a keen edge can still slice cleanly if the bite is thin and the angle is true, but aggressive profiles that hook will chip teeth, shock the rotor, and send vibration into mounts.
Carbide survives contact with frost hardened debris but demands a steady hand to avoid chipping the edge, while sharp steel pays off in clean timber at low temperatures provided you accept shorter life between flips or replacements. Retention torque drifts in the cold as hardware contracts, so crews should retorque early in the shift and again after the first hour of work, with paint marks to show movement.
Door angle also needs attention, since brittle chips fly farther, and a shorter throw protects public edges and saves time on cleanup. After a cut, check case lines and breathers for ice, warm the machine fully before a heavy bite, and write a cold specific bite rule where operators can see it.
For more detail on how cold affects power transfer, seals, and chip behavior, fold your attachment notes into the seasonal practices in cold weather performance and power loss prevention tips, then brief the crew so no one is surprised when the first frozen stand feels different under the head.
Here is a short cold weather checklist that sits well on the dash, one minute to read, big payback in the row:
- set a thinner bite for the first hour, increase only when chip flow stays steady and vibration remains low
- retorque a sample of teeth after warmup and again at the first pause, remark fasteners so drift is obvious
- shorten throw with a conservative door angle near public edges, brittle chips travel farther and faster in cold air
Use this list to protect teeth and bearings in winter starts, then expand it with your site specifics once crews feel the difference between a summer slice and a winter cut.
After debris events and temporary works, picking durability first
Recovery work after a blowdown, a flood, or a heavy construction week asks for a different order of priorities, survival first, finish second, because the attachment that shrugs off contamination will keep your schedule intact, while a fragile profile will give you a perfect finish for an hour and then sit in the shop.
Choose a tooth with more mass at the tip and a base that supports the lock, pick a positive geometry that resists spin under shock, and use hardware your crew can torque with field tools so checks happen on time. Add chain or curtain packages that close gaps, and pick a door angle that lays chips down in a short arc so the return stays clean and the next pass starts smooth. Operators should treat every shadow as a potential hard object, approach slowly, and watch the first foot of chip stream for a color change that tells you dirt or metal has entered the flow.
Plan to clear ends and lips more often than you would on clean ground, and train a simple call and response on the radio for pause and reset, because clarity keeps the rhythm calm when the ground is trying to pull you out of it.
If questions come up about which attachment suits which debris pattern or which guard fits your head, point operators and planners to the quick answers and practical diagrams in the help center, then update your sheet in the cab so the next shift runs the same plan without guessing.
“Attachment choice is the first decision that shapes your day, if teeth match the fiber, angle matches the bite, and retention matches the tools you carry, the head feels calm and the acres stack up.”
Jordan Wells, Field Supervisor
Matching attachment physics to carrier and goals

An attachment does not live alone, it lives on a carrier with a specific drive layout, hydraulic capacity, and weight limits, and it has to serve an objective that might be finish quality, acreage per hour, or a public safety buffer near a line or a road. Matching attachment physics to the carrier and to the mission avoids the two classic failures, a tooth set that overloads the drive and runs hot, or a featherweight setup that keeps the engine coasting while acres lag behind.
The method is to work forward from the goal, define the finish, the coverage target, and the edge rules, then work backward through pattern, bite, door angle, and finally tooth style and retention. At the same time, confirm that the attachment mass and rotor inertia fit your pumps and pressures, and that the retention torque values are realistic for tools your team actually has.
When you align these elements, the machine holds speed on a modest bite, the chip stream stays smooth, operators stop less for resets, and your service intervals stretch because heat never gets a free run.
Tooth geometry, bite angle, and retention torque, turning force into clean chips
Tooth geometry is where power meets fiber, and small changes in angle or height create big changes in required torque and in chip quality. A leading edge that slices at a conservative angle will cut smoothly in clean wood and will hold chip size steady, while a more aggressive hook creates a faster first bite that can grab and bog in stringy brush.
The choice is not one or the other for every site, it is which geometry matches the stand in front of you today and the finish the client expects at the edge of the block. Bite angle at the head and hand feel at the sticks must match that geometry, with operators thinning the bite as soon as stream quality drops or as soon as vibration hints at an uneven path, and with supervisors writing a short rule that keeps everyone on the same target. Retention torque glues this all together, because a tooth that shifts even a few degrees under load will change the effective angle and start the vibration cycle that cooks seals and loosens every other fastener on the head.
Mark fasteners after torque, check a sample at the first pause, and replace hardware that no longer holds spec. If your crew needs quick access to torque charts, tooth identification, or a memory jogger on angle and bite combinations, post a one page reference from the resources center in every cab so the numbers are always close at hand and the language stays consistent shift to shift.
Drive pairing and inertia, picking mass that your carrier can spin all day
Attachment mass and rotor inertia must fit the carrier, because a head that is too heavy or too slow to accelerate will tempt operators to overfeed to feel progress, which drives the system into relief and turns diesel into heat. Pick a rotor and tooth set that spins to target speed quickly and that holds that speed on a modest bite, then tune ratios and pattern to protect that window.
Light profiles with sharp steel help small carriers feel lively in clean stands, while heavier carbide sets give large carriers a calmer feel in abrasive ground. The goal is not to chase speed, it is to hold a steady stream with a bite that matches your chip quality and safety rules.
Door angle integrates with this choice, because a longer throw wastes energy in most public interfaces, and a shorter throw saves fuel and leaves a cleaner return path.
For buyers or managers who want to see how these choices add up to predictable output across long windows, step through the production planning and specification notes in forestry sector requirements for high output mulchers, then translate those notes into your own attachment and ratio decisions so your carrier and head feel like a matched pair rather than a compromise that tires operators.
Before you set a new head to work, write three pairing checks on your commissioning sheet, quick to run, hard to ignore:
- record time to target speed and confirm the rotor holds speed during a modest bite, if it sags early, reduce bite or revisit ratio before the day burns
- check relief settings at temperature and verify case drain behavior, a drifting number here tells you the head will run hot and waste fuel
- set door angle for the first block, shorter throw near public edges, longer only in clean open ground, then review chip stream at the first pause
These checks turn a guess into a plan and protect both the carrier and the head from a week of preventable heat.
Documentation, spare sets, and support, keeping attachment choices repeatable
Good attachment programs win because they are repeatable across crews and weeks, not because one operator has a feel for every stand.
That means you need documentation that fits in the cab, spare sets that match your typical work without waiting on freight, and people who answer when a field question comes up.
Start with a one page sheet for each head that lists tooth options, retention torque, and a bite and angle rule for your three most common sites, then stock a small kit with fasteners, inserts, and a labeled torque tool so shifts do not start with a hunt for parts.
Add a simple wear and rotation log that lives in a plastic sleeve, and when a crew flips or replaces teeth, ask them to mark the row and the reason in a single sentence, so the next team knows what changed and why.
When your operators have a question about compatibility or a failure pattern, give them a clear route to ask and get a practical answer quickly, because early answers are what stop a five minute concern from growing into a long afternoon.
If you want to show clients the people behind your program and make it easy for crews to understand who builds and supports the heads you run, point them to about us, then pin the contact details in the cab so help is one call away when time is tight.
Get a tailored attachment plan for your season
Attachment choice gets easier when the rules are written down and the options are narrowed to what your season really asks for, and the fastest way to lock that in is a one page plan that ties species and soil to a tooth set, a bite rule, a door angle, and a rotation schedule that your crew can follow without debate.
We build that sheet around your carrier and head, we include a cold start variant for winter runs, and we map a corridor version for public edges so chip throw stays inside the buffer. We also include a small parts list that matches your field tools so torque checks happen in minutes and your first hour is never wasted hunting for a socket.
If you need a plan that fits your machines and your ground, please get in touch and we will turn your notes and your targets into a simple sheet that makes attachment selection a calm decision and not a last minute guess.